Setting up Google Vertex AI
The short instructions (Without images)
Step 1: Sign Up for Google Vertex AI
- Create a new project in Google Cloud.
Step 2: Enable LLaMA 3.1 API Services
- Navigate to the Model Garden within Google Vertex AI.
- Search for and enable the LLaMA 3.1 API services.
Step 3: Set Up Service Account Key
- Go to the IAM section in Google Cloud.
- Select your service account
- Create a new service account and enable the Vertex AI Administrator role
- Navigate to the “Keys” tab.
- Create a new key and save it securely for future use.
The Long instructions (With images)
Create a new Google Cloud Project
Click “NEW PROJECT” .
Give your project a name. Click “CREATE” .
Select your project.
Click “llama-3-405b " link.
Click Search bar
Search for and click “Vertex AI” .
Click “Model Garden” .
Click " SHOW ALL” .
Click “ENABLE” .
Click “CLOSE” .
Click “Llama 3.1 API Service” .
Click “ENABLE” .
Click Hamburger menu .
Click “IAM & Admin” .
Click “Service Accounts” .
Click " CREATE SERVICE ACCOUNT" .
Give you it a name such as OpenAI API
Click “CREATE AND CONTINUE” .
Select a role
Search for Vertex.
Click “Vertex AI Administrator”
Click “CONTINUE” .
Click “DONE” .
Click “your service account” link.
Click “KEYS” .
Click “ADD KEY " .
Click “Create new key” .
Click “CREATE” .
Download your key.
Click “CLOSE” .
Litellm setup
Installing LiteLLM
Since many applications are designed to support OpenAI-compatible APIs, you’ll need to set up LiteLLM Proxy. This proxy runs as a Docker container, translating requests between your application and the LLaMA 3.1 405B model on Google Cloud.
Install Docker and Docker Compose
- Ensure that Docker and Docker Compose are installed on your system. If you’re using Debian-based Linux, refer to my tutorial [here] for installation instructions.
Create Docker Volumes Create a Docker volume to store configurations with the following command:
sudo docker volume create litellm_db
Set Up Docker Compose
- Create a new Docker Compose file and paste the following configuration:
services: litellm: image: ghcr.io/berriai/litellm:main-latest restart: unless-stopped ports: - 4000:4000 depends_on: - litellm-db env_file: - .env environment: DATABASE_URL: postgresql://${POSTGRES_USER}:${POSTGRES_PASSWORD}@litellm-db:5432/${POSTGRES_DB} LITELLM_MASTER_KEY: ${LITELLM_MASTER_KEY} UI_USERNAME: ${UI_USERNAME} UI_PASSWORD: ${UI_PASSWORD} STORE_MODEL_IN_DB: "True" litellm-db: image: postgres:16-alpine healthcheck: test: - CMD-SHELL - pg_isready -U ${POSTGRES_USER} -d ${POSTGRES_DB} interval: 5s timeout: 5s retries: 5 volumes: - litellm_db:/var/lib/postgresql/data:rw env_file: - stack.env environment: POSTGRES_DB: ${POSTGRES_DB} POSTGRES_USER: ${POSTGRES_USER} POSTGRES_PASSWORD: ${POSTGRES_PASSWORD} restart: unless-stopped volumes: litellm_db: external: true - Create a
.envfile with the following content:LITELLM_MASTER_KEY=sk-1234 POSTGRES_DB=litellm POSTGRES_USER=litellm POSTGRES_PASSWORD=litellm UI_USERNAME=Fletcher UI_PASSWORD=Q6ryAJ!A7jC7UUaA*PadFatwxKUWXdR_ litellm_db=litellm_db
Start Docker Compose Start the Docker Compose setup with the following command:
sudo docker compose up
Verify Docker Setup Check if everything is running correctly by using:
sudo docker ps
Configuring LiteLLM
Configure LiteLLM to Interface with Google Vertex AI
- Navigate to
http://your_docker_ip:4000/ui. - Create an admin account.
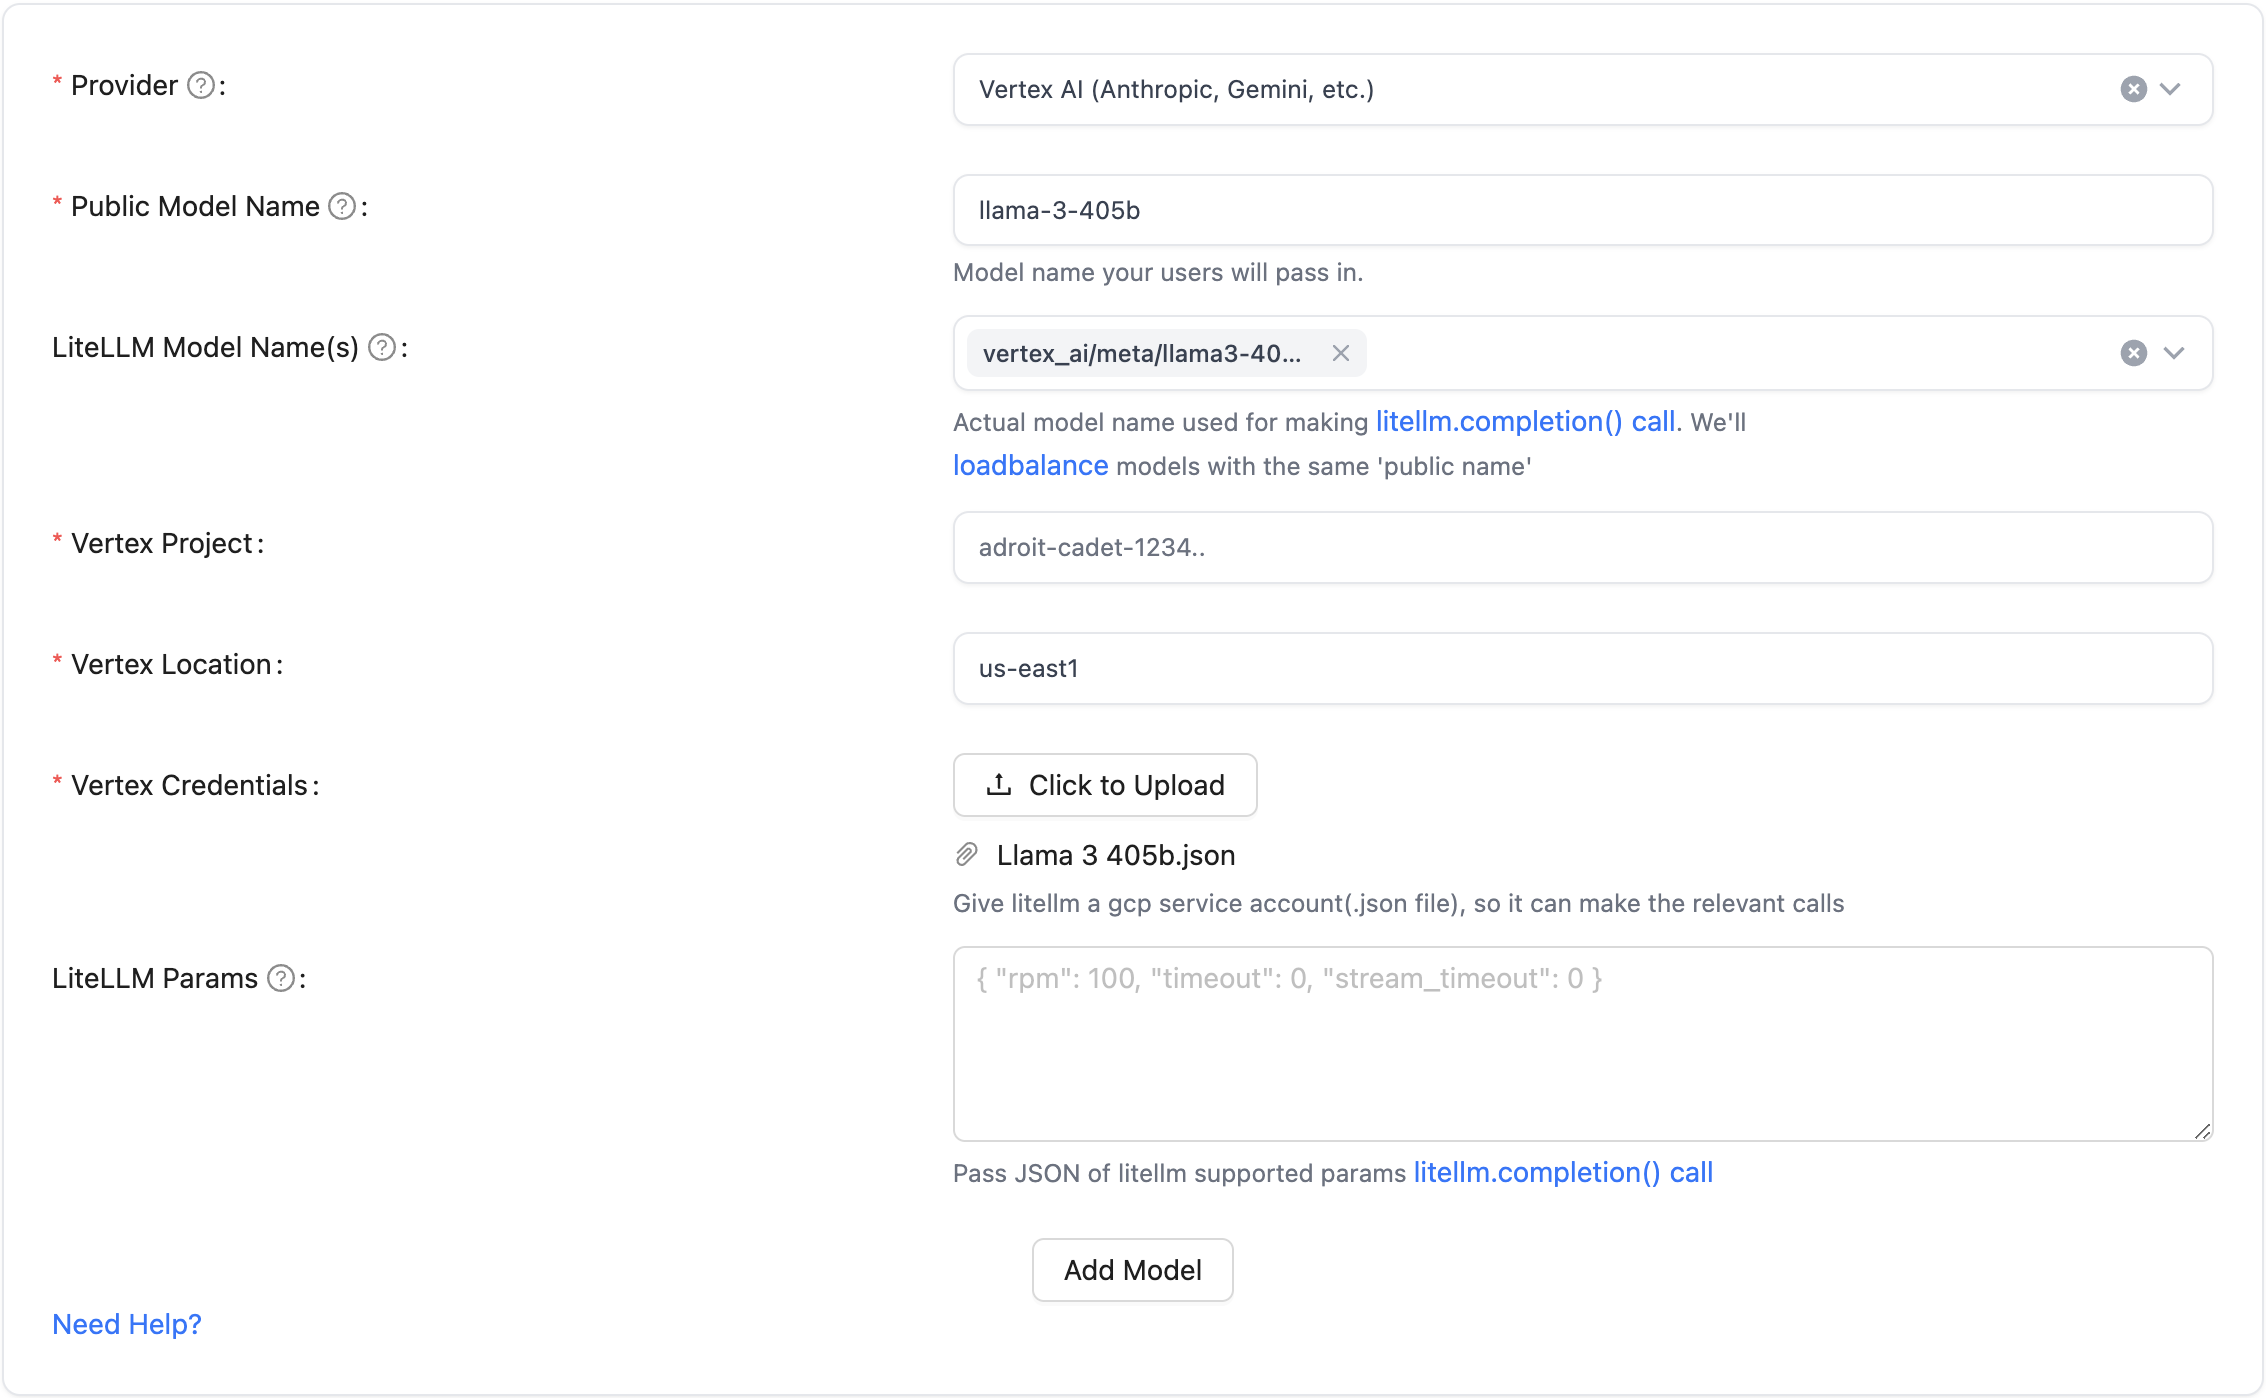
- In the “Models” panel, add a new model.
- Use the API key you saved earlier to configure the settings to match the image below

Verify Configuration
Once saved, go to the /health tab to ensure everything is working correctly.
Using Your Setup You can now send OpenAI-compatible requests to your LiteLLM Proxy, which will translate and forward them to Google Vertex AI, returning a compatible response.
For instructions on setting up a ChatGPT-like web UI to use your new, free, and private access to LLaMA 3.1 405B, follow my guide here.